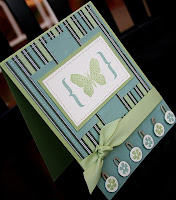
I love the color combinations that are posted on SPcolorcombos. Samantha is coming up with an awesome color challenges, and this week wasn't any different. It wasn't easy to add the yellow in, but it was a blast to play. Here's the color challenge:
and here's my card:
Ok gals, I admit that I can't get away from Holiday cards lately. It seems like at least every other challenge I'm particpating in, I'm making a Christmas card!!
I had the idea for a little bit to use the xxx alphabet set, but I hadn't come up with the write card to do it on. This card was turning into the perfect one for this alphabet set, and put it over the top fun. Hope you enjoy!!
Ciao
-------------------------------------------------
I used the following product on this card (all product Stampin' Up! unless otherwise noted):
Stamps: Snow Buddies (116505), Christmas Punch (115366), Jumble Alphabet (115199)
Paper: BashfulBlue(105120), Real Red (102482), So Saffron (105118), Old Olive (100702), Watercolor Paper (105019)
Ink: Bashful Blue (105209), Real Red(103113), So Saffron (105213), VersaMark (102283), Real Red Marker (100052), Bashful Blue Marker (105111), So Saffron Marker (105114)
Accessories: Glassy Glaze Enamel Stampin' Emboss Powder (100477), Scallop Edge Punch (112091)
Tuesday, September 29, 2009
Monday, September 28, 2009
Mojo Monday Week 106
I LOVED this Mojo Monday sketch this week. Here is the sketch:and here is the card that I made:
Rose Red and Certainly Celery - what a great color combination. This card was just a simple but cute thank you card. The white popped so well on the Rose Red cardstock, and just makes the rose pop. Hope you enjoy looking!!
Ciao
Tips from this card:
-Don't be afraid to combine stamp sets and use stamps in a different way. Central Park is intended as branches, but work really great as leaves as well.
-------------------------------------------------
I used the following product on this card (all product Stampin' Up! unless otherwise noted):
Stamps: Fifth Avenue Floral (113734), Central Park (113732), For all you do (115360)
Paper: Kraft (102125), Certainly Celery (105125), Whisper White (100730), Rose Red (102544), Thoroughly Modern DSP (115673)
Ink: Whisper White (101731), Certainly Celery (105217), Sage Shadow (102532), Rose Red (101778)
Accessories: 1" Double Stitched Rose Red Grosgrain Ribbon (111846), 1/4" Whisper White Grosgrain Ribbon (109025), Scallop Edge Punch (112091)
Sunday, September 27, 2009
Color Throwdown #61
Just a quick post today. The color throwdown colors this week were awesome, and I had so much fun playing with them.
I used the really retro stamp set for the sentiment on this, and had a ton of fun with all of the brads. This was just a really fun card full of paper/ribbon layering. Lessons learned from this card - you can so easily pair colors together that don't look like they will match at first glance. Give it a try - you never know what you will come up with.
Ciao
Saturday, September 26, 2009
Thank U
I was searching around on blogs yesterday and found this great picture on Design*Sponge, and I've attached it here.I immediately thought about how cute that would look as a card. I didn't have the perfect paper that I wanted, but I did find some paper that would make do. Here is the card that I made, as part of the Stamp Something challenge to create a card using a layout that I created or one that I found somewhere:
I used some old Stampin' Up! DSP that I had around and cut out the circle with my Circle Scissor Plus (what a fabulous tool).
Tips from this card:
-In a sentiment, cut the words out, and then piece them back together on your card. Not only does it allow you to fit your sentiment into a different space than the stamp intended, but it changes up the same sentiment.
-------------------------------------------------
I used the following product on this card (all product Stampin' Up! unless otherwise noted):
Stamps: wow - Define Your Life (114950), Calendar Alphabet & Numbers (111610)
Paper: WhisperWhite (100730), Retired DSP
Ink: Not Quite Navy (103008)
Accessories: Circle Scissor Plus (112530), Round Tab Punch (108340), Vintage Brads (109109), Retired Stampin' Up! Baja Breeze Ribbon, Scrap of white ribbon
Pink on a Christmas card??
I went out on a limb with this x-mas card, thanks to the SPCC x-mas combo #4 challenge. Here were the colors I had to work with:and here is my card:
I created a card with the same snowflake punch a couple weeks ago, but I just can't get enough of this punch!! The color combination on this card was fun, especially given that it is a christmas card. I think the pink on this really worked though as an accent color. Shocked when I was writing this and realized that I didn't use a single stamp on this card. Hope you enjoy!!
Tips from this card:
-I originally had two button on the lower right corner of my card, and then I traded those out for buttons cut out with my Big Shot. We all love those buttons, but try alternative embellishments... the Big Shot buttons will allow you to customize your colors.
-------------------------------------------------
I used the following product on this card (all product Stampin' Up! unless otherwise noted):
Stamps: wow - None.
Paper: Pixie Pink (105121), Very Vanilla (101650), Close to Cocoa (101341)
Ink: None
Accessories: Jumbo Snowflake Punch (116628), Scallop Edge Punch (112091), 1 3/8" Circle Punch (104401), Sizzix Buttons #5 (113440), Hemp Twine (100982), 1/4" Chocolate Chip Grosgrain Ribbon (111367), Designer Buttons Button Latte (114333)
Tuesday, September 22, 2009
SPCC #16 Color Combo Challenge
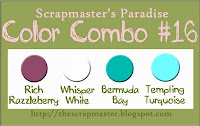
The color combo for this week was so fun for SPCC - thanks Samantha for such great colors. Here is the color combo:
and here is my card:
This was such a simple and fun card to make. I think I'm enjoying playing with making my own backgrounds more than I am using DSP right now. It's hard to believe. This card used a variety of stamp sets to achieve the backgrounds, the fabulous in-color ribbons (I used the backside of the ribbons), and a fun little greeting. In the coming days I plan to make a thank you card set to go with this card as a birthday gift for a friend. I'll make sure to post my card set when it's finished.
Tips from this card:
-Try making your own printed paper and not using DSP sometimes. It brings simplicity to your card without being boring. And remember - your stamp-a-ma-jig is your friend in doing this!!
-Your in-color ribbon has dual uses - polka dot and solid. Remember that solid side - you have two ribbons in one.
-------------------------------------------------
I used the following product on this card (all product Stampin' Up! unless otherwise noted):
Stamps: Circle Circus (115778), Park Avenue Patterns (114445), On Your Birthday (111664), Lexicon of Love (Retired)
Paper: Bermuda Bay (115317), Rich Razzleberry (115316), Whisper White (100730), Tempting Turquoise (102067), Kraft (102125)
Ink:Rich Razzleberry Stampin' Pad (115316), Bermuda Bay Stampin' Pad (115317), Tempting Turquoise Stampin' Pad (100814), Rich Razzleberry and Bermuda Bay Stampin' Write Markers (sold as a set of six in color markers - 116329)
Accessories: Rich Razzleberry 1/2" Polka-Dot Grosgrain Ribbon (115613), Bermuda Bay 1/2" Polka-Dot Grosgrain Ribbon (115610), Tempting Turquoise 1/4" Grosgrain Ribbon (109038), Round Tab Punch (108340)
Monday, September 21, 2009
Mojo Monday Week 105
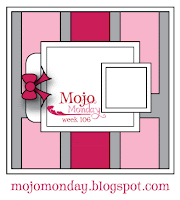
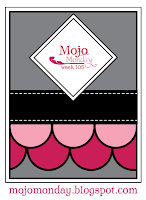
Time for another Mojo Monday sketch. I combined this challenge with the SCS Color Combination 236 challenge. Here is the Mojo Monday challenge:
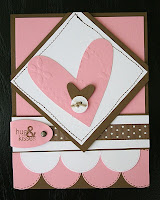
and the CC236 challenge was to use Pretty in Pink, Whisper White and Soft Suede. Here is my card:
I'm in the fall/christmas mood, but the pink and color screamed valentines day, so I went that directions. This card was very simple to make, and used my Big Shot to cut out the button and hearts. I used a circle punch to cut out the 7 circles, and used Stampin' Write markers to make the faux stitching on all of the circles.
I was originally going to use the soft suede ribbon on it's solid side, but when I finally put the card together, I really liked the look of the polka dot. Look below for all ingredients of this card.
Tips from this card:
-Even the little details can make a difference. Make use of the texturz plates with the Big Shot as I did on the large heart. It helps to break up the 'white space', and adds that finishing detail.
-------------------------------------------------
I used the following product on this card (all product Stampin' Up! unless otherwise noted):
Stamps: All Holidays (114916)
Paper: Soft Suede Cardstock (115318), Whisper White (100730), Pretty in Pink (100459)
Ink:Soft Suede Stampin' Pad (115657), Soft Suede Stampin' Write Marker (sold as a set of six in color markers - 116329), Pretty in Pink Stampin' Write Marker (100045)
Accessories: Vintage brads (109109), Stampin' Up! Hearts and Brackets Die (115955), Sizzlit Die Buttons #5 (113440), Texturz Plates Stampin' Up! Backgrounds 1 (114512), Small Oval Punch (107304), 1 1/4" Circle Punch (104403), Hemp Twine (100982), 1/2" Polka-Dot Soft Suede Grosgrain Ribbon (115612), Stampin' Dimensionals (104430)
SCS FS137 Challenge
Trying a few new challenges, and did I have fun today or what. This was my card for Featured Stamper 137 over on Splitcoast Stampers.
This card was based on a card from Tankgrl,and I kept the design components of the card, but changed the color scheme, a couple of the brads, and the sentiment.
The DSP and ribbon on this card are all from retired products, but the image is from the On Your Birthday stamp set. The image was stamped with Crushed Curry and Basic Black, and I used the Crushed Curry ink to edge the sentiment.
Tips from this card:
-Use something besides adhesive on your card. Stampin' dimensionals add some height and dimension to your card to create a more interesting card. Dimensionals were used on this card to adhere the sentiment to the card
-To take a plain piece of paper a step up, use your Stampin' ink pads to edge your paper. You can do a light edging to separate the paper from your card base, or a heavier edging that will clearly show up on your card.
---------------------------------------------
I used the following product on this card (all product Stampin' Up! unless otherwise noted):
Stamps: On Your Birthday stamp set (111664)
Paper: Soft Suede Cardstock (115318), Kraft Cardstock (102125), Very Vanilla Cardstock (101650), Retired Stampin' Up! Designer Series Paper
Ink:Crushed Curry Stampin' pad (115659) Crushed Curry Stampin' Write Marker (sold as a set of six in color markers - 116329), Basic Black Stampin' Write Marker (100082), Close to Cocoa Stampin' Write Marker (100072)
Accessories: Vintage brads (109109), Flower Assortment Designer Brads (112583)3/16" Corner Rounder (109047), Stampin' Dimensionals (104430), retired Stampin' Up! Ribbon Originals
Sunday, September 20, 2009
Color Throwdown #60
I've had this card finished for a couple days, but I've been busy with several other projects, and haven't had time to sit down and post this. The challenge for the Color Throwdown #60 were:I was so excited when I saw these colors - what a fabulous combination. I'll start with my creation:Admittedly, I went really crazy with the layering of cardstock. I seem to be starting out with one version of a card, and ending up with something totally different lately. I started out with a base card of full of colored polka dots - boy what a change of card. I used the Fifth Avenue Floral stamp set to create the flowers, and then used the Sizzix Buttons #5 to cut out the buttons in the center on my Big Shot. The scallop punch was used, and I used the crop-a-dile to cut out small circles in the scallops. I added a little bit of ribbon weaving on this card, and also some zig zag stitching on my sewing machine. A little too many layers?? Maybe, but I like it anyways!!
Saturday, September 19, 2009
My Recent Birthday trip
Oh boy - anyone who knows me can attest to the fact that I've been dreading my 30th birthday since I turned 29!! Crazy, I know, but there was/is something about turning 30 that just bothered me. So, when it came time for the big birthday a couple weeks ago, I was determined to not spend it alone. I couldn't spend it with family or my fiancee, so I spent it with friends instead - on the beach. Here are some pics (I love black and white photos).
So I have to admit, besides not having access to the internet that weekend (there was wireless in the lobby but it was soooo slow - I'm spoiled), I actually had a good birthday - can't ask for much more than sun, beach, and good temperatures. It wasn't too painful, although I ate way too much. I'll be spending several weeks working off that overly indulgent weekend.
PPA8 Challenge
The PPA 8 challenge was for a KISS card - clean with lots of white space; simple design; minimum time to create; limited layers and embellishments. Here is my card for this challenge:
I had a template for cutting out the tree, which I cut out of a piece of To the Nines DSP. I then used the Buttons #5 Sizzlit Big Shot die. I cut the buttons out of Always Artichoke and Pumpkin Pie cardstock, and To the Nines and Pumpkin Pie DSP. I adhered the buttons with glue dots or Stampin' Dimensionals. The sentiment was from an older set, and I attacheda couple pieces of ribbon using a staple. An incredibly quick card to make that was super simple, and I love how it came out.
Thursday, September 17, 2009
SPCC Christmas Color Combo #2
I love love love making Christmas cards, so I couldn't not participate in the SPCC Christmas Color Combo. Here was the challenge:
I remember seeing this scrapbook image from a couple years ago with gifts along the bottom, and I thought that was perfect for this card. Here's what I did:
Ok, so I did actually stamp on this card, but admittedly not much. I used Real Red, Old Olive and Handsome Hunter on this card. I cut out the dots using my Big Shot and the Big Bold Cupcakes die. I used a few buttons from the Playground Designer buttons, hemp twine, ribbons from the newest mini catalog, and 1/4 white grosgrain ribbon. The image was from an old stamping set that I had. I was all ready to put a nice 'Merry Christmas' sentiment above the ribbon, but then I remembered that I had a 'do not open til Christmas' stamp, and I thought that woudl be perfect. This was a super simple card to do, but looks so fun!!
SPCC #15
This was such an incredibly hard challenge for me. First off, here was the Color Combo #15 Challenge:
I knew I wanted to do a halloween card with this combo, and thought it would be easy - boy was I wrong!! I had such a difficult time with this challenge, and sat down with this card many times to try and rework it until I had something I was finally happy with. Here is what I finally came up with:
The only original components of the first card that made it into my final card was the black card base and the rust stamped bracket. Nothing else really worked on this card, but I love the final version.
The stamped image was from the Twick or Tweet stamp set. I stamped it on Naturals White cardstock twice, and cut one of those images out to add a little dimension. The image was colored in with the Really Rust chalk from my Stampin Pastels. For the background, I cut out a Scallop Square using my Big Shot, and then added strips of various papers (from Night and Day DSP, Really Rust Cardstock) and Black Gingham Ribbon. Finally, the bracket was cut using my Big Shot out of Naturals White cardstock, and stamped with one of the stamps from the Circle Circus stamp set with Really Rust ink.
Monday, September 14, 2009
Mojo Monday Week 104 Sketch Challenge
The Mojo Monday sketch this week was a tough one for me. I needed a Thank You card for tomorrow, so I was restricted to that idea. I wanted to use this sketch for everything but a thank you card today!! Here is what I came up with:
I like this card better in person than in the pictures. The pictures fail to capture that I used dimensionals on the circles, so it's not as flat as it appears in the pictures. I used Sage Shadow, Melon Mambo, Certainly Celery, and Kraft for this card. The kraft background paper was made using a couple stamps from the Circle Circus stamp set. I used the same set on the strip of Melon Mambo paper. The thank you sentiment was from the Taggers Dozen stamp set. Both the circles and the flower/leaves were cut out using the Big Shot (Circles #2 and Birds and Bloom). I finished the card off with a few embellishments - eyelets and a filigree Brad.
This is not my favorite card, but I do really love the color combination. I'll be playing around with this color combination more this week.
Sunday, September 13, 2009
Color Combo Challenge
This card was my final challenge card of the day, and was designed for the SPCC #14 color challenge. The challenge was to use the following colors on my card:
Here is my card for this color challenge:
I stamped a variety of snowflakes using Ballet Blue, Basic Gray, and Soft Suede. I punched three snowflakes out of each of these colors, and used a white gel pen to create stitching on the snowflakes, and topped the snowflakes off with white buttons. The Joy sentiment was stamped with white craft ink. I like the simplicity of this Christmas Card.
Flowers and Polka Dots
More challenges today. I'm sick at home, and using my down time to relax and do some stamping. My creativity is a little low, so these challenges are giving me a good starting point for today. This card was made for both the Curtain Call Color Challenge and the Cute Card Thursday Challenge. The challenge for Cute Card Thursday was green and pink, and the Curtain Call Color Challenge was Melon Mambo, Certainly Celery, Kraft, and Very Vanilla. Here's what I came up with:
I used the For All You Do Stamp Set. I stamped four stems using Sahara Sand Ink (closest thing I had to the Kraft color). I then stamped flowers in Melon Mambo and Certainly Celery and cut out the flowers. I punched holes in each flower and inserted a brad. I wrapped jute twine around the base of the stems and added a button from the Playground Designer Buttons.
The images on the right were all cut with the Scallop Square punch. Polka dots were stamped in Sahara Sand, Melon Mambo, and Certainly Celery, and the sentiment came from this same stamp set.
Color Throwdown #59
There was a fabulous Color Throwdown this weekend. The challenge was to use the colors Ruby Red, Pumpkin Pie, and Chocolate Chip. This is what I came up with:
This card will be a little thick to mail, but I love the way the ribbons look. I cased the ribbon idea (still trying to figure out the blog I got it from to give credit). I used a retired orange ribbon, and paired it with Chocolate Chip grosgrain ribbon. The stamped images were from the Paradise stamp set. I inked the image in Ruby red, and then rocked the image on chocolate chip to create the brown colored tips. The sentiment came from the Full of Life stamp set. It was a great color combination and perfect for fall.
Frosty the Snowman
Today is a day for challenges on my blog. I have several different cards that I've made for challenges. This first card was for Weekend Sketch Challenge #97 on Beate's blog. Here was my interpretation for the sketch:
I like the simplicity of this card, with the more complex stamped image. This card was so easy to make, easy to color in since the image is more of a sketch versus distinct lines. This may be the basis for a card for an upcoming stamp-a-stack.
The stamp set was from the Jolliest Time of the Year stamp set. It was inked on Very Vanilla cardstock, and colored in with the Aquapainter and Watercolor Wonder Crayons. The snowflakes on the bottom were stamped with Sahara Sand, Bordering Blue, and Close to Cocoa ink. The snowflakes were from a variety of stamp sets, to give a bit of variation. The base of the card was Kraft cardstock, with the large circle cut of out of Sahara Sand cardstock. I used some of the same ribbon from yesterday, as I love the look it adds to the card.
Saturday, September 12, 2009
Inspiration
I was searching around on blogs this morning, and checked out Dawn McVey's blog. She always has great ideas, and that was certainly the case today. I had an initial plan for stamping today, but after visiting her website, I came up with a whole new idea. Here are a couple of the cards I made today, all based on her blog from today.
I had used several background stamps to create the varied backgrounds. I used most of the paper for Christmas cards, but loved the color combination so much that I wanted to do something beyond Christmas. This is a fun and simple birthday card. The sentiment is from the 'On Your Birthday' stamp set. Made two versions of this card - the first version I accidentally put a staple through the back of the card!!
This is one of 5 Christmas cards that i made today with this paper. The greens are very traditional Christmas colors, but I love throwing the pink color in there (Cameo Coral). The top paper was actually made with the Circle Circus stamps. I couldn't have done this without the Stamp-a-ma-jig. It came in handy when trying to match up these images. I've been saving this ribbon from last years catalog because I love it so much. I used it a bunch today, so it's almost gone unfortunately.
This is my favorite card from today. I love the background stamp on the top (from the Park Avenue Patterns stamp set). On the bottom, I've been getting bored with just the plain scallop edge punch, so I decided to change it up a bit. After using the scallop edge, I then took the small punch on the crop-a-dile and made a hole above each scallop. This has taken the same punch and made it look like two different punches...I'm liking it!! The tag was from one of the current SU Hostess sets - looks fabulous stamped with Sage Shadow Ink on Certainly Celery cardstock.
Pals Paper Arts Sketch
This was a card that I did for the Pals Paper Arts sketch. I was thinking about this all last night, and finally came up with an idea that I liked.
I used Rose Red, Not Quite Navy, and Certainly Celery Ink. The colors are bright, but I really like the outcome. I haven't really used the Circle Circus stamp set, but I started to play with it yesterday, and the ideas have started to flow with this stamp set. It's quickly going to become one of my favorite sets.
Wednesday, September 9, 2009
Mojo Monday 103 Card
Time for Mojo Monday - here is the card I came up with. What a great sketch!!
I used Certainly Celery and Sage Shadow cardstock, with some retired DSP in the background. I used the For All You Do stamp set. To make the butterfly spotted, I stamped two images of the butterfly. On one butterfly, I cut the inside of the butterfly out, so I was left with a template. I put this template on the other butterfly, and stamped my coordinating dots. This prevented the dots from going outside the butterfly image.
My Bigshot got some use on this card, as I embossed circles on the pieces of Sage Shadow paper (hard to see in the picture). The card was not quite complete until I added the small flowers on the bottom, each with a hemp twine loop.
Tuesday, September 8, 2009
PPA6 Challenge
This was a tough challenge for me - these are not colors that I would normally combine together. Thanks to this challenge, I jumped a bit out of my comfort zone.
The color challenge was for Brocade Blue, Crushed Curry, and Ruby Red. I started out with the Gallery stamp set in Ruby Red on Whisper White cardstock, and then trimming around the edge. In the center, I framed an image from the Pocket Silhouettes stamp set, stamped in Crushed Curry. I cut photo corners out for the upper left corner. On the bottom of the card, I pulled my sewing machine out and stitched a couple lines. On each end, I put buttons from the Playground Designer Buttons, tied with hemp twine.
Subscribe to:
Posts (Atom)
Welcome to my site!!
I recently moved to Arizona a couple months ago, and am very happily settling into a new career. I was introduced to stamping over 10 years ago. I've always been into crafts, and picked back up with stamping a couple years ago. I love that I finally have the time to dedicate to my crafts, and that I'm able to share my ideas with everyone. I've seen myself grow in my creativity over the past couple years, and to those who say that they are not creative - don't believe it. Anyone can do this, and creativity doesn't happen overnight, it evolves as you learn more and more about the art of stamping. My husband is incredibly supportive as I put more time into my stamp designs and my scrapbooking.